
Introduction to Burning the Atmega328 Bootloader
By Burning the Atmega328 Bootloader, you use a little more memory in the chip, but for most users, it’s easier to upload future projects. Basically, the bootloader allows the microprocessor to receive a new project from your pc through the TX and RX pins. This happens immediately after you or your programming device resets the processor. Examples of programmers that take advantage of this include the CH340G, FTDI Basic, PL2303, or CP2102.
For example, let’s say your purchased a new Atmega328 IC as a backup for your Arduino UNO. If this new IC did not come with a bootloader already pre-installed, you might use this procedure. Additionally, if you plan to use the Atmega328 as a stand-alone chip for a project, you might use this procedure to burn the bootloader.
It’s important to realize that you can choose not to use a bootloader at all. In this case, you can just use this procedure to program a chip using the Arduino as an ISP programmer.
Set up your primary Arduino board.
Additionally, you will need an Arduino UNO, NANO, MEGA, or other microcontroller board. This board should already have the bootloader installed. In the Arduino IDE, locate the “Arduino As ISP” Example. This is under File | Examples. Upload this sketch to your arduino UNO board.
Make your connections
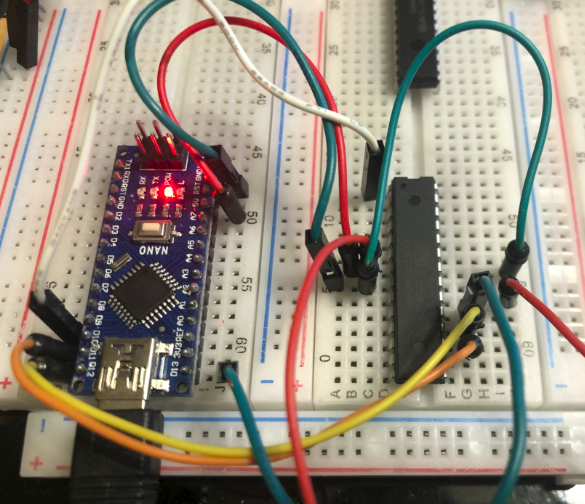
To program an Atmegs328, connect GPIO Pins 13, 12, 11, and 10 on the Arduino board to IC pins 19, 18, 17, and 1 respectively. Start with #1 on the top left pin, and count around the IC counterclockwise on the IC to be programmed. The top of the IC will have a notch, or a “dot” on pin #1. For programming the Atmega328, we’ll also connect +5v to IC Pins 7 & 20. At the same time, connect GND to pins 8 & 22. If you are using another type of microcontroller, then GPIO pins 13, 12, 11, and 10 will connect to SCK, MISO, MOSI, and RESET respectively.
Here is my setup using an Arduino Nano as the programmer.
Burning the Bootloader
In the Arduino IDE, go be sure you have the correct board and port selected under “Tools”. Under Tools | Programmer, Select “Arduino as ISP” (Not ArduinoISP). Finally, go to Tools | Burn Bootloader.
You should get a message that your flash is successful.

Congratulations! You are now ready to use the Atmega328 as a replacement IC for the UNO. Another option is to set this chip up as a “Breaduino”. This would be a standalone processor on the breadboard.
To Set up the Atmega328 on a breadboard
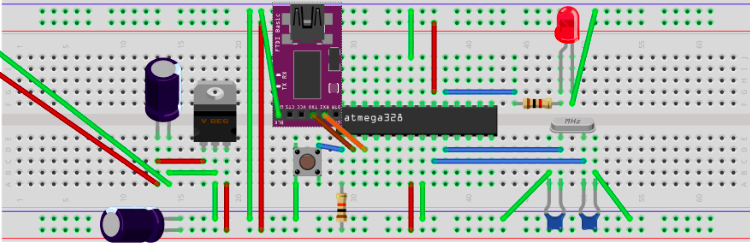
If your goal is to use this processor in a stand alone configuration, follow the procedure to set up the Atmega328 on a breadboard. Click here to get the step by step procedure. It’s important to realize that with this setup, you will manually need to reset the processor with the reset button to upload a project after you have installed the bootloader. If you want the reset to happen automatically, simply place a 100nF capacitor in series between the DTR pin of the programmer (if you have one), and Pin 1 (RESET) on the processor. Apply 9V to the red and green power lines on the very left of the image. (Red being +).
When finished, your project should look similar to this:
For other information on Arduino for beginners, check out the category page!
— Ricky Bryce