
Introduction to ControlLogix Rate Calculation
In this post, we’ll do a simple ControlLogix Rate Calculation. We’ll be doing this in ladder logic. In this case, we’ll have a changing value, such as counts from an encoder. We’ll use ladder logic to calculate the rate of the pulses. However, another way to do this is with special instructions available in Function blocks, such as the totalizer.
One way to do this is by taking a sample every second. Likewise, you could take a sample every minute instead. Whenever you take a larger sample, your value would be more accurate. In this case, we’ll just stick with counts per second.
In this example, I’ve created a separate program in the controller with a Ladder Logic routine called “RateCalculation”. Always remember that if you create a new subroutine, you will need to jump to that subroutine from a routine that is executing. Usually, you will simply add a new JSR into the MainRoutine of your program.
This method might not be for everyone… Use at your own risk and discretion!
Create Your Tags
Before we begin, we’ll create several tags: CurrentValue will come from our encoder (or other tag that we need the rate of). Our LastValue tag will be a snapshot of the CurrentValue Tag. The Rate tag will display the increase in counts per second. Lastly, we’ll use the OneSecondPulseTimer to generate a pulse every second. This will trigger our logic for the rate calculation.

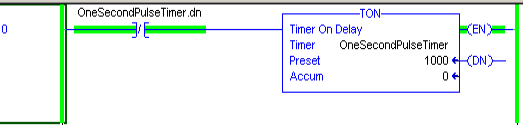
Create a Self Running Timer
First, we’ll create a self running timer. The purpose of this timer is to give us a pulse every second. After that, we’ll use this pulse to perform a calculation, then store our current value.
A self-running timer is simply a timer that resets itself. When the DN bit goes high, the timer’s rung goes false. This causes the DN bit to go low again, and restarts the timer. It’s important to realize that in ControlLogix, your preset is in milliseconds. This means that if we want a 1 second pulse, we set the preset at 1000.
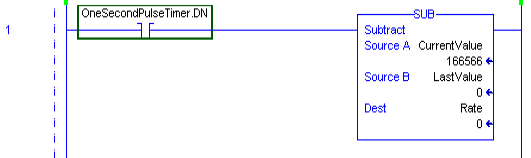
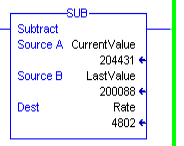
Calculate the Rate
Secondly, we simply need to subtract the LastValue from the CurrentValue. This will tell us how many pulses have happened in the last second. We’ll store the result to the “Rate” Tag. We’ll condition the SUB statement so it will only happen one time per second.
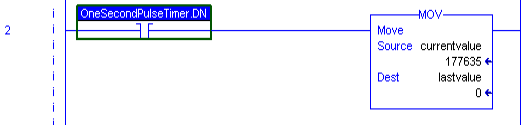
Lastly, after we get the pulse, and have performed the subtraction, we need to store the CurrentValue tag to the LastValue Tag. This will set us up to perform the calculation properly the next time we get a pulse.
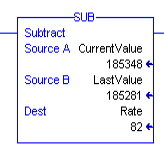
Once we finalize our edits, our rate tag should show how much the CurrentValue changes every second.
Modifying your logic for Minutes
There are two ways to modify this logic for counts per minute. One way is to simply multiply the rate by 60. However, the best way is to simply increase your timer’s preset to 60000 (60 seconds). This will give you a more accurate rate. Here is an example of our new rate with the timer’s preset increased to 1 minute. Keep in mind, though, that your rate will only update once a second.
Summary
In short, this is a simple way to get a rate using ladder logic. Other ways of doing this would be to simply put an encoder channel into frequency mode. Also you could use more advanced instructions in function blocks. Using this method, we simply take a snapshot of a value, and a short time later, we just see how much this value changes. Keep in mind that if this logic is in a continuous task, your rate may vary depending on your scan times. Consider putting the logic into a periodic task. That way you can somewhat guarantee the execution time.
Visit the ControlLogix Category Page for other ControlLogix posts!
— Ricky Bryce