
Introduction to RSView32 with ControlLogix
In this section, we’ll be using RSView32 with ControlLogix. RSView32 is an HMI interface. That is to say, it’s for humans to interface with machines. With RSView32, you might display data in the processors memory. That way, a machine operator can read values such as temperatures and pressures. Likewise, the operator might use an RSView32 display to write to a tag.
Keep in mind that RSView32 is older software. It’s original design does not include ControlLogix tags. However, we can use RSLinx as a OPC Server. RSLinx will connect to the processor using a TOPIC. The Topic simply represents the path to the processor.
After that, RSView32 can access memory locations in your ControlLogix processor. It does this through the DDE Topic that we create.
Create the OPC Topic
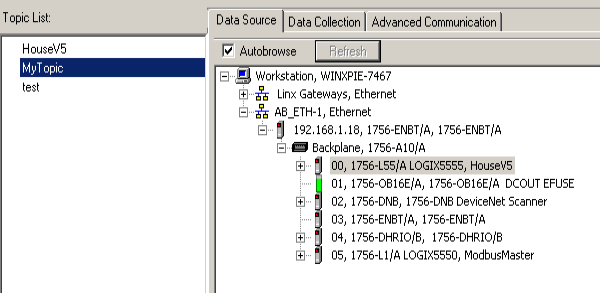
First, we will create a OPC Topic in RSLinx. In this case, we’ll just create a new topic. As I said before, this represents the path to your processor. RSLinx Lite does not support this. You must have a paid version of RSLinx, such as RSLinx Professional, or RSLinx Gateway. I will assume that you already have your drivers set up in RSLinx. For example, you can read the post on configuring the Ethernet driver here.
To configure a topic, simply right-click your processor in the RSWho screen of RSLinx. Choose “Configure New Topic”. I’ll just create “MyTopic”. Emphatically, be sure you have both the processor, and the topic selected at the same time. Press “Apply”.
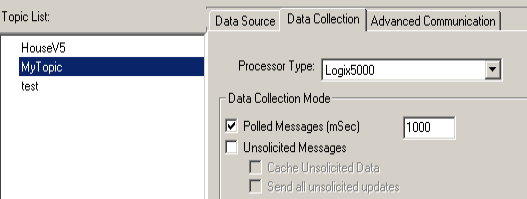
One option that you have here is to set the update time. This is on the Data Collection tab. By default, the update time is 1 second.
Create a Controller Tag
Let’s go to Controller Tags. We’ll simply create a controller tag that RSView32 will write to. This will prove out our work here. In this case, I’ll just create a tag called “MyBit”. This will be the BOOL (Boolean) Data Type. In other words, the bit can only have one of two values: On or Off.

Configure RSView32 Communications
At this point, we’ll open RSView32. Create a new file. I’ll Just call this “MyProject”.
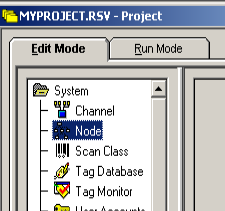
Under System, We’ll go to “Node”.
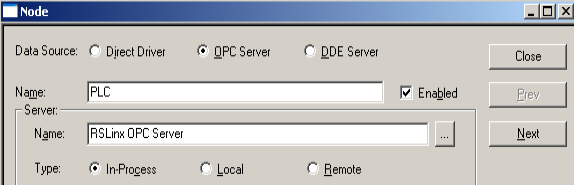
We’ll set the device source to OPC Server. In this case, I’ll just name this PLC. Hit the ellipsis to browse for the RSLinx OPC Server.
Create a Tag
At this point, we are ready to create an HMI tag. This tag simply points to a memory location. In this case, well, name the tag “MyBit”. For consistency, we’ll keep the tag name in the HMI the same as the tag name in the PLC.
Go to the Tag Database
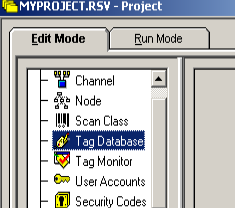
We’ll add the tag as shown. As you can see, the name is “MyBit. The type is “Device”. You can browse for the node name and PLC Address.
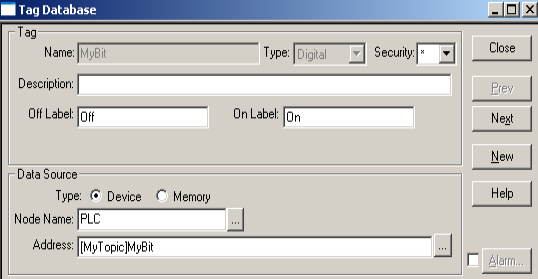
Be sure to hit accept, and close.
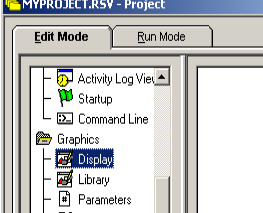
Add a button to your Display
Double click “Displays” under Graphics. This creates a new display screen.
At last, we are ready to add a button to the display. Be sure to open one of your displays, then we’ll go to Objects | Advanced | Button. Draw your button on the display. You will see the Properties screen appear.
Under “Action”, we’ll click “Toggle”. Browse for your tag, then hit OK.

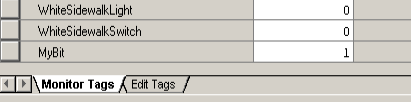
Obviously, we need to test our work. At this time, click the play button on your standard toolbar to test the display.

Finally, press your button on the display, and you should see MyBit change to 1.
Summary
In short, RSView32 is older software. However, we can still interface with ControlLogix using DDE or OPC. OPC is more efficient. Simply create the topic, and add your node in RSView32. Next, create a tag, and point that tag to a memory location. You are now ready to use the tag on your objects.
For more information, visit the ControlLogix category page!
— Ricky Bryce