
Introduction to TOD and FRD Instructions
We use the TOD and FRD Instructions to convert a value to and from BCD. Specifically, the TOD converts to binary coded decimal. Likewise, the FRD converts from binary coded decimal.
Binary Coded Decimal (BCD) uses a bit pattern to represent a value. Every 4 bits represents a digit of the full number. Devices that use BCD include some thumb wheels and 4 digit LED displays. Typically, we have 16 inputs on our input module. This works out nicely for 4 digit BCD devices.
How Binary Works
Consider the following table:
- 0000 – 0
- 0001 – 1
- 0010 – 2
- 0011 – 3
- 0100 – 4
- 0101 – 5
- 0110 – 6
- 0111 – 7
- 1000 – 8
- 1001 – 9
Basicaly, in the example above, each number has a 4 digit bit pattern. The right most digit is the least significant digit. We call this Bit #0. The value of this position is 2 to the power of 0, which is 1. This means that if all the bits are off, except for the least significant bit, then our value is 1.
Now, if you look at the decimal value of 2, you will see that bit #1 is turned on. This represents 2 to the power of 1, which is 2.
Look at the number 3. the two most least significant bits are high. Therefore, we have 2^0 plus 2^1 = 3….
By the time we get down to 9, 2^3 is high, which is 8. Additionally, 2^0 is high, which is 1. Therefore we add both values together and get 9.
How BCD Works — TOD and FRD Instructions
To understand BCD, keep in mind that computers think in binary. Since every 4 bits represent a digit of a number, an 8 bit word can represent two digits. Let’s look at an example:
Consider the following 8 bits:
1001 1001
Since 1001 is “9” in Binary, the above example is “99” in BCD.
Let’s try an 16 bit number:
0111 0110 0011 0001
From left to right, 0111 is the binary value for a 7. 0110 is a six, and 0011 is a 3. Finally, 0001 is the value of 1. Therefore this bit patter represents 7631 in BCD.
In ControlLogix, your typical word is 32 bits. Eight Hex/BCD digits can represent these 32 bits. For the examples, below, we’ll just use an 8 bit INT to keep things simple. This will help you understand how the instructions work.
The TOD Instruction
Keep in mind that the TOD instruction converts TO BCD from Decimal. For example, we have an LED display. The display accepts BCD Input. We need to take a value from a tag, and convert that to BCD. After that, we send it to the display. Let’s look at an example in ladder logic.
Before we add the instruction, let’s take a look at a couple tags.

In this case, DecimalValue is the tag we wish to convert to a BCD bit pattern. For this reason, we’ll add the TOD instruction to logic.
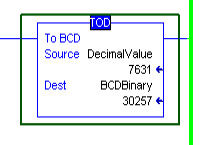
You will notice the above instruction displays the decimal equivalent of both the source and destination. Look at BCDBinary. Because the instruction is showing the destination in decimal, but it’s really in BCD, we don’t see the same number. However, let’s go look at our tags, and see if it makes sense.

As you can see, on the BCDBinary tag, the leftmost digits are 0111. This is a 7. Likewise, the next 4 bits are 0110, which is a 6, then we have a 3, and a 1. We can now send this value to a BCD Device.
The FRD Instruction
FRD is just the opposite of TOD. This time, we take a binary BCD Value and convert it to Decimal. I’m going to delete the TOD, and write a 0 to our DecimalValue tag. If the FRD is working properly, it should write the value of 7631 back to “DecimalValue”. A good example of using the FRD would be on a thumb wheel. Remember, the thumb wheel puts a 16 bit pattern on our input module. We want to convert this bit pattern to a decimal value.

Now, let’s add the FRD Instruction
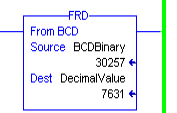
As you can see, our instruction is working properly

Summary for TOD and FRD Instructions
To summarize, the TOD converts TO BCD, usually for a value going out of the processor. Likewise, FRD converts FROM BCD. Again, this would probably be a value coming into our processor from a BCD Device. It’s important to realize that Decimal and BCD are not the same. At least after the value of 9.
For more information, please take a look at the ControlLogix Category Page!
— Ricky Bryce