
Introduction to the ControlLogix SRTP Instruction
Generally, we use the ControlLogix SRTP Instruction for heating or cooling control. We’ll just concentrate on heating control for the first part of this post. that will keep things simple. In the second part of this post, we’ll discuss a heat/cool process.
With heating control, we will not send a direct analog signal. Instead, we send pulses that are proportional to an analog signal. This is similar to the way PWM (Pulse Width Modulation) works, except much slower. SRTP is short for “Split Range Time Proportional”. Let’s say we have a 10 second cycle time. For example, if we call for 50% heating, the output might be high for 5 seconds, then low for 5 seconds. Likewise, if we call for 75% heating, the output will be high for 7.5 seconds, and low for 2.5 seconds.
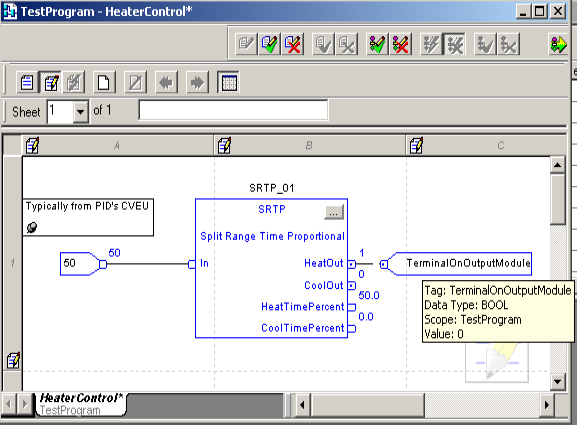
Typically, we feed an input to the SRTP instruction from a PID. For this post, though, we’ll concentrate on how the SRTP itself works. We’ll just feed some static values to it’s input.
Add the SRTP Instruction to Logic
The SRTP instruction only supports function blocks. Therefore, we’ll need to create a function block routine. Don’t forget the JSR instruction in the MainRoutine so your subroutine will execute. To add the SRTP Instruction, just right click the sheet, and choose “Add Element”. Search for SRTP. Let’s set up our routine as follows:
Configure the SRTP for Heating Control
At this point, we’ll hit the Ellipsis. This gets us into the configuration for the instruction. The Ellipsis is the 3 dots within the gray square. It’s in the upper right corner of the instruction.
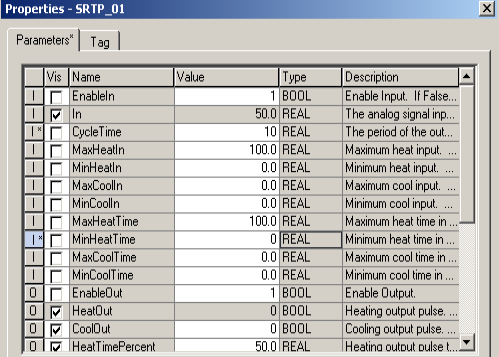
First, we’ll set our cycle time in seconds. You might want to check the manufacturer recommendation for the heat bands. We don’t want the cycle time so low that we cause excessive wear on the contactor that powers the heat bands. On the other hand, we don’t want it so high that our temperature fluctuates a lot between cycles. Another consideration is the thermal stress on the heat bands. With a high cycle time, the heat bands might continuously change temperature. This would be similar to a flashing incandescent lamp which will blow prematurely.
Secondly, we configure the minimum and maximum acceptable values for our input. This is MaxHeatIn and MinHeatIn. I’ll set the max to 100, and the minimum to 0. These are the min and max values of the input for heating control.
At last, we set up the MaxHeatTime and MinHeatTime. Pay attention to the actual names of the fields. It’s human nature to put the minimum values first. This is a common mistake. Here, we’ll set the MaxHeatTime to 1000 and the MinHeatTime to 0.
Test your work!
At this point, we’ll finalize our edits. With 50% input, you should see the HeatOut, which is ON for 5 seconds, and OFF for 5 seconds.
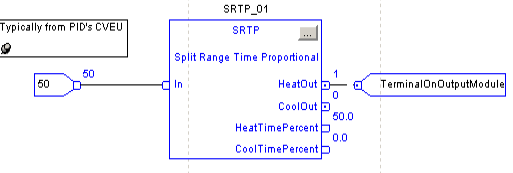
For a HEAT/COOL Process (Different Setup for example)
- You might set MinHeatIn and MinCoolIn to 50%. Above 50% input we would start heating, then below 50% input, we would start calling for cooling.
- MaxCoolIn would be at 0%. MaxHeatIn would be at 100%
- With this setup, at 0% input, we have Maximum Cooling…. As the input value increases, we call for less cooling until we hit 50% input. Above 50% input, we start to call for heating. At 100%, we reach maximum heating.
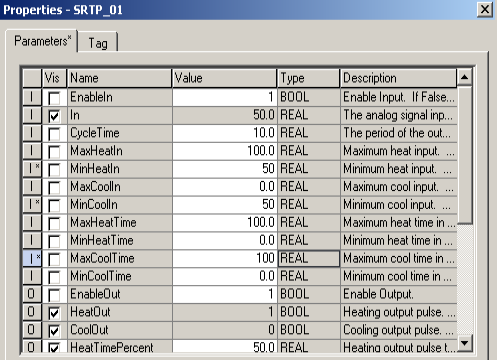
At 50% Input, not a lot happens… This is because 50% is our minimum value for heating and cooling. Let’s try 75% Input.
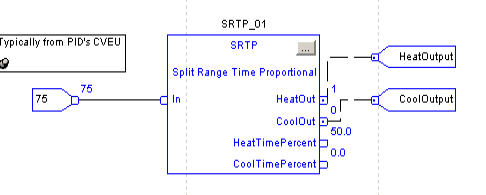
At 75% Input, we call for heating 50% of the time. Remember our MinHeatIn is 50 and MaxHeatIn is 100. 75% is in the middle of our heating range,
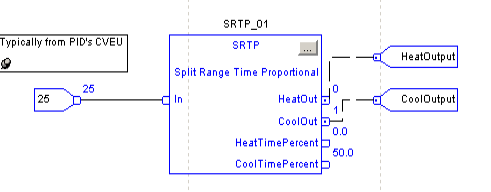
With this in mind, let’s try 25% Input. This is in the middle of our cooling range. Keep in mind that 0% input is max cooling, and 50% input is minimum cooling. Therefore, our CoolOut bit should be high 50% of the time.
Summary of ControlLogix SRTP Instruction
In Short, we like to send pulses to control heat bands instead of a direct analog signal. The heat bands are generally on or off. The SRTP allows us to create a pseudo-analog signal with on-off control. For cooling control, our output might connect to a solenoid on an oil cooler.
For more information, visit the ControlLogix Category page!
— Ricky Bryce