
Introduction to the ControlLogix Masked Move (MVM)
The ControlLogix Masked Move (MVM) allows us to move data from one word to another. We do this through a mask. In other words, we can filter out some of the bits, so they do not change the destination. One example for the MVM is for alarms. We might have alarm conditions which connect to an input module. Let’s say that only certain alarm bits will cause a horn to blow. We can move the data from the input module through the mask. We compare the destination word against the value of 0. If the destination is a non-zero value, the horn blows. Our mask tells the MVM instruction which values to pass, and which values to filter out.
Create Your Tags
Before we begin, we’ll create three tags. MVMSource is where we get our data from. This could come from an input module, or any other word in memory. Secondly, we’ll have the tag called MVMMask. The value of this tags will tell the Masked Move instruction which values to pass. Turn on any bit that you want to pass from the source to the destination. On the other hand, any bit that is off will filter the data. The destination bit will not be touched. Lastly, we’ll create the MVM destination. This will be the result after the MVM instruction executes.
For example, we’ll give all three tags the DINT data type. Let’s set all of the styles to “Binary”. This will help us to see what is happening in the instruction.

At this point, let’s go to “Monitor Tags”. To demonstrate, we’ll start with some initial values.
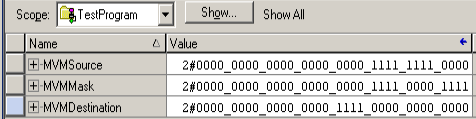
Keep in mind that we did not write the instruction yet. All I did was enter this data as initial values. We see that each word is divided into “Nybbles”. A Nybble is 4 bits. Sometimes you will see it spelled as “Nibble” as well.
Write the Instruction for the ControlLogix Masked Move (MVM)
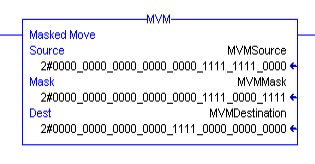
At this point, we are ready to add the instruction to logic.
In this case, our mask is a tag. Keep in mind that you could also have used a constant. Usually, if this is a constant, you will see it in hexadecimal. To enter the mask as a constant in Hexadecimal, you would use 16#00000F0F. We’ll just leave this as a tag.
Analyzing the Data
We are ready to take a look at our tags.
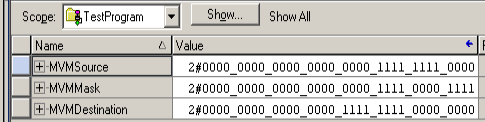
The least significant nybble is on the right. As you can see, it did move 0000 to the destination. However, the destination was already at 0 anyway, but if any bits were on, the masked move will overwrite them in the destination.
Look at our next nybble. These are bits 4-7. None of these bits moved, because they were shut off in the mask. In the third nybble from the right (Bits 8-11), you see that all four bits move to the destination. At the same time, in the Forth nybble (Bits 12-15) did not move. These are shut off in the mask.
Alarm Usage
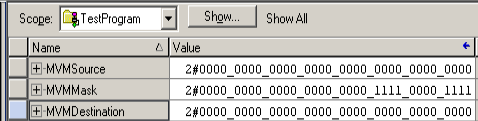
Generally, we can use the MVM for alarm conditions. Consider MVMSource to be an input module. We have 32 alarm conditions (or 16) connected to this input module. For instance, let’s say that only bits 0-3 and 8-11 will sound a horn. The other conditions are less critical, so we only want an alarm on the MMI. To demonstrate, I’m going to clear all of the bits in the source and destination words. In other words, we will start off with no alarms, and a clean destination.At t
At this point, we’ll add a second rung to our logic. If the MVMDestination tag does not equal zero, we’ll sound the alarm horn.
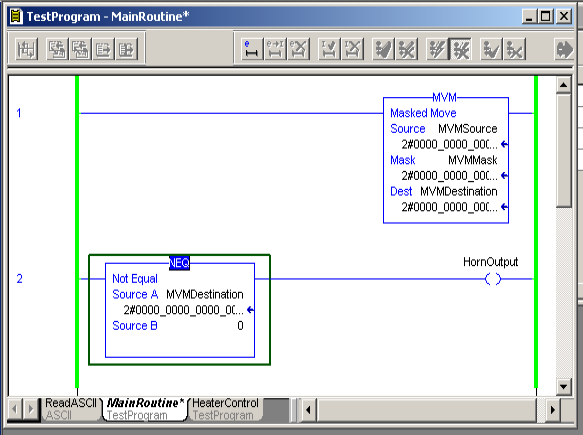
Now, let’s experiment with the tags. I’m going to turn a critical alarm bit on.
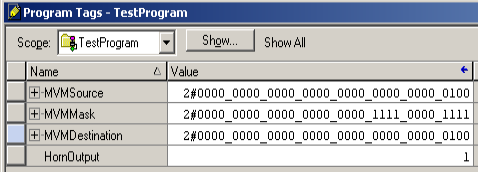
As you can see, if I turn on a critical alarm bit, then this bit passes to the destination. After that, MVMDesitnation is a non-zero value, and the horn will sound.
On the other hand, let’s clear this alarm, and turn on a non-critical alarm bit.
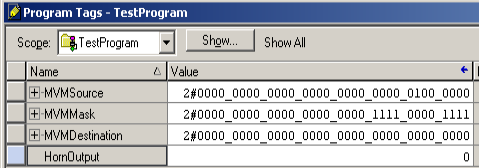
In this case, the mask did not allow the non-critical alarm bit to pass to the destination. Therefore, the destination tag remained at 0. The alarm did not sound.
Summary for ControlLogix Masked Move (MVM)
In short, the MVM works a lot like the standard MOVe instruction. The exception is that it goes through a mask first. Bits that are set in the mask pass data. Bits that are not set, do not pass the data.
For more information, visit the ControlLogix Category Page!
— Ricky Bryce