
Introduction to the ControlLogix Multiplexer (MUX)
With the ControlLogix Multiplexer (MUX), we can select one of 8 inputs. Generally, these inputs will have the REAL Data Type. Basically, the SELECTOR input chooses which of these 8 inputs to use.
There are several uses for the ControlLogix Multiplexer (MUX). One use would be for operator panels. The operator may choose which speed a drive needs to run. The MUX instruction would pick which operator panel is active. Therefore, we know which operator panel to pull data from to control the drive. Another option would be for tank levels. The operator can simply select a tank. The level of that tank would then go to a single tag to display the tank level.
Other options might include selection of a flow sensor to use for PID control, or even to select which PID to get data from to control a valve.
It’s important to realize that you cannot use this instruction in ladder logic, or structured text. We’ll set it up as a function block. In order to use function blocks, you must have a software license that supports function block programming.
Create Your Tags
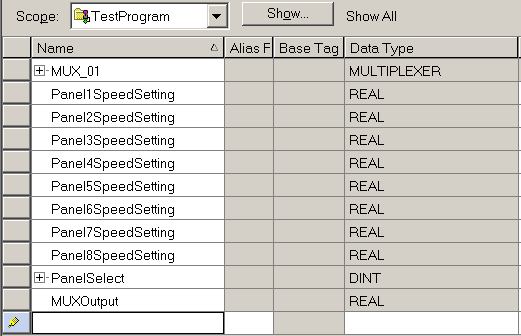
In order to see the instruction work, we’ll create a few tags. We’ll have some speed settings for a drive from various operator panels. We’ll create these tags with a REAL data type. That is to say, we can use decimal values. Additionally, we’ll have a tag to select which input we wish to use. The selector tag will have the DINT data type. We’ll also have a tag to write the speed setting to. This tag will be REAL.
You can add these tags online as long as you don’t have your key locked into run mode. Just be sure to go to “Edit Tags” to add the following tags.
Note: That was interesting… When I created Panel8SpeedSetting under version 20.04 in Windows XP, RSLogix 5000 gave me a fatal application error. This would happen every time I attempted to go online after that. I went to another laptop with Windows 10, running 20.05 and I can get online again now!
At any rate, let’s go back to “Monitor Tags”. Let’s place some values into the panel setting tags. Additionally we’ll place the value of 1 into the PanelSelect Tag.

Set up the Logic
At this point, we’re ready to back to the MUX instruction to complete our logic. We’ll create a new function block routine. Don’t forget to add the JSR to the MainRoutine so your function block routine will execute.
In addition to the MUX instruction, we’ll need 9 IREF’s, and an OREF. If you are online, please remember to put the routine into edit mode. Another option is to drop offline to make your changes. Keep in mind that if you drop offline, you will need to download to get the changes into your processor. Remember then when you download, though, your system goes down.
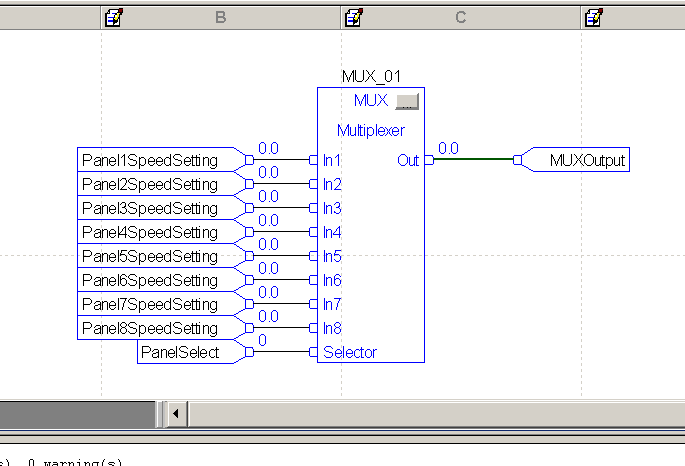
At last, we’re ready to finalize our edits and test our work. Keep in mind that the PanelSelect tag has the value of 1 right now. In other words, we should be pulling data from Panel1SpeedSetting to pass to the output.
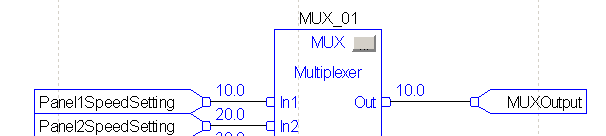
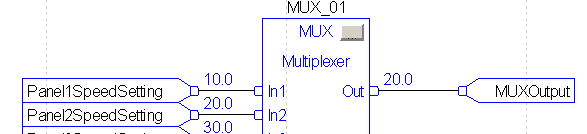
As you can see. This is working as we expect. Let’s change the value of PanelSelect to 2, and see if we get a 20.
Summary for ControlLogix Multiplexer (MUX)
In short the ControlLogix Multiplexer (MUX) instruction simply selects from various inputs. The Selector tag tells the instruction which input to pass to the output tag. Remember, you can only use it in function blocks. Ladder and structured text do not support this instruction.
For more information, visit the ControlLogix Category Page!
— Ricky Bryce