
Introduction to ControlLogix Branching in Ladder Logic
ControlLogix Branching in Ladder Logic allows us to create “OR” Statements. Sometimes getting a branch on the right place in a rung is tricky for beginners. In this post, we’ll take a closer look at branching, We’ll discuss different ways to set up branches, and how to set them up correctly.
Different techniques to add branches include: drag and drop, text entry, and menu entry with your right mouse button. Additionally, you can add or delete branches or branch levels whether you are online or offline. It’s important to realize though, that to perform an online edit, you will need to follow the online editing procedure.
Basic Logic Concepts
There are several types of logic gates, but for this post, most importantly, we’ll discuss AND, OR, and NOT. For the most part, conditions that are AND’d together are in series. On the other hand, conditions that are ORd together are in parallel. A NOT Condition looks for a value of zero on it’s operand (tag) to be true.
AND Logic
Here, we have a very basic rung. We would say this in English as “If A AND B then C” If A is true, then the processor moves on to look at B. If it’s also true, then it writes a value of 1 to C. Both instructions must be true. If A is false, there is no need to scan B. The processor could just write the value of 0 to C. For this reason, a good programmer will place whatever is most likely to be false first on the rung when it’s in series with other conditions. In the long run, this could save some execution time. Here we are using the XIC instructions. The XIC instructions look for a value of 1 to be true. They are not intensified right now, so we know the value of A is zero, and B is zero as well.

OR Logic
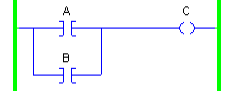
Whenever we have conditions on branches, this will be an OR statement. In this case, if the processor sees that the top branch is TRUE, then it does not need to scan the other branches. As soon as it sees a true branch, it can move on past the branch to other instructions on the rung. For this reason, a good programmer will place whatever is most likely to be TRUE on the top branch leg. In English, we would say this as, “If A OR B then C”. One or the other has to be true. (Or both, it’s not exclusive.)
NOT Logic
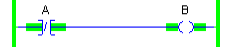
We use the XIO instruction for bit level NOT logic. Basically, this instruction just looks for a 0 in the operand (tag) to be true. We would say this in English as “If NOT A then B”. In this example, we see that the value of A is indeed zero. The instruction is intensified (green).
Working with ControlLogix Branching in Ladder Logic
At first, branches are a little tricky to work with. By default, the branch is the second icon in the instruction toolbar.

We’ll drag this down into logic.
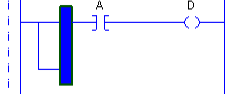
Our goal is to branch around A. We have two options for this. We can only move the right side of the branch leg. So we can either move the leg around A, or we can grab the middle of the XIC (for A), and drop it into the middle of the branch. When you drag on drop an instruction, be sure it’s the instruction itself that you drag. In other words, if you drag the tag (A), you are not getting the whole instruction. You just drag the tag. You will see the outline as you drag the whole instruction. At this point, you can add the XIC, and set B as the tag.
Nesting vs Adding Branch Levels
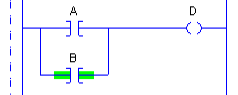
Let’s say that we want to add and XIC with the tag “C” on another branch leg below B. Simply right click the bottom left corner of the branch, and add branch level. Another option is to drag a branch level from the instruction toolbar. This is the third icon.
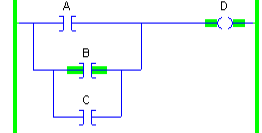
When you are finished, your logic should look like this:

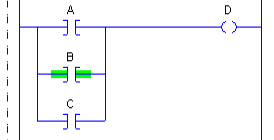
If it looks like this, then you did it wrong. The image below shoes a nested branch. This increases the processor scan time, and you can only go so many levels deep. Additionally, it just looks bad.
Sometimes, you have no choice but to nest branches. Such as in this example.

ASCII text entry for ControlLogix Branching in Ladder Logic
Some programmers like to enter everything in ASCII. It’s usually quicker if you are familiar with the mnemonics. Let’s go back to a simpler example for this:
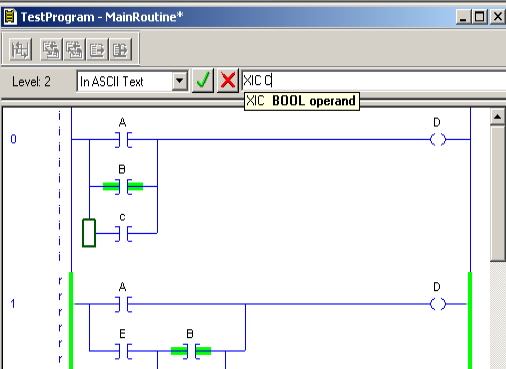
Now let’s look at the ASCII text for this branch. You can display the ASCII text for any branch by double clicking the rung number. If you are online, you may need to double click twice, but be sure to cancel any edits afterward, so you don’t accidentally make any changes.

As you can see, sometimes it’s easier just to drag and drop branches. BST starts the branch, then we have the XIC A. After that, we have NXB (For next branch level). This is where we have the XIC B. Likewise, we have another branch level with the NXB where we have XIC C. After that, we type BND to end the branch.
If you already have an existing branch, you can simply edit the ASCII text on that branch level. Simply double click the left side of the branch you wish to add instructions to. After that, you can type your mnemonics without erasing the whole line.
As you can see, I’ve double-clicked the bottom left side of a branch leg, and added text to the branch leg only.
Deleting Branches
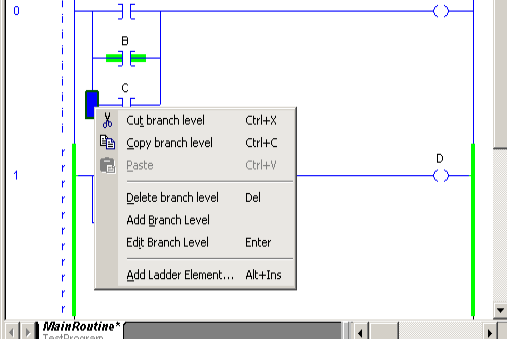
To delete branches, simply be sure you are in edit mode. After that, right click the left corner of the branch you wish to delete. From there you can delete the branch level.
For more information, check out the ControlLogix Category Page!
— Ricky Bryce