
Resolving ControlLogix I/O Not Responding
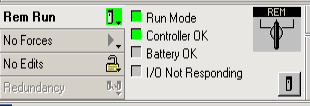
If you have ControlLogix I/O Not Responding, you will have a blinking green I/O light on the processor. Additionally, while you are online, you will see “I/O Not Responding” in the online toolbar. The newer processors have an alphanumeric display which could give you some information to help resolve the problem.
The reasons for ControlLogix I/O Not Responding include loss of power or communication on a remote chassis, a bad module, or a misconfigured module. Additionally, there could be a problem with any other scheduled connection such as producer/consumer.
If you just added a new module, and you get this error, then chances are that you simply have the module set up wrong, or are not communicating with the module yet.
Let’s say the system has been running though, and you suddenly get this error. In this case it’s possible that you could have lost power on a remote chassis. Additionally, a module could be bad or missing, you have a bad cable, or even a problem on a communication port on your Ethernet switch.
In this post, we’ll take a look at how to resolve this error.
Determine Where the Problem Is
The easiest way to determine what module or chassis has a problem, is to go online. We’ll look at the I/O Configuration tree. You will see a caution sign on a module or chassis. This is a yellow triangle with the “!” in the middle. The icon is a bit small on the module, so look closely. Here is an example where I’ve lost connection to a remote chassis.
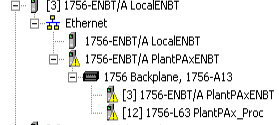
As you can see, I have a problem with the PlantPAxENBT. Obviously, if I lost this module, I would loose everything underneath of it. For this reason, we look for the first caution sign.
Determine What the Problem Is
Now that we’ve found the offending module, we need to get a description of the problem. Go to the properties of the module with the first caution sign.
At this point, click the “Connection Tab”
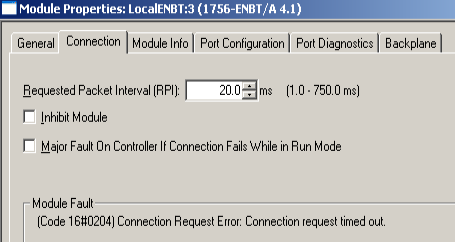
As you can see, my connection timed out. This is common if there is no power on the remote chassis, or we lost communication with the chassis. Check the status lights on the remote module. Additionally, check the status lights on the Ethernet switch as well. The Ethernet switch will have status indicators for each port.
Since this module is a 1756-ENBT, I will refer to this catalog number. You may have an EN2T, etc, which should work the same way.
Check both the port that the local ENBT connects to, and the remote ENBT. If they are plugged into two different switches that communicate with each other, then check the communication between both switches.
Additionally, you could plug your computer directly into one of the switches to try to PING both ENBT’s. Just be aware that if you plug your computer into an Ethernet/IP network, you could be putting some TCP/IP traffic on that network. Obviously, you would want to be sure the IP address of your computer is in the same subnet as the Ethernet modules.
Obviously if the problem is on a single I/O module, and the system has been running without errors, you might try to re-seat the module. You might even have to replace the module.
Other types of errors include “Major/Minor firmware Incorrect”, “Invalid Connection size”, etc We’ll cover some of these in the next section.
If you just Added a Module and have ControlLogix I/O Not Responding
If you just added a module, and have ControlLogix I/O Not Responding, chances are that you mis-configured the module. Either that, or you don’t have communication yet to a remote chassis.
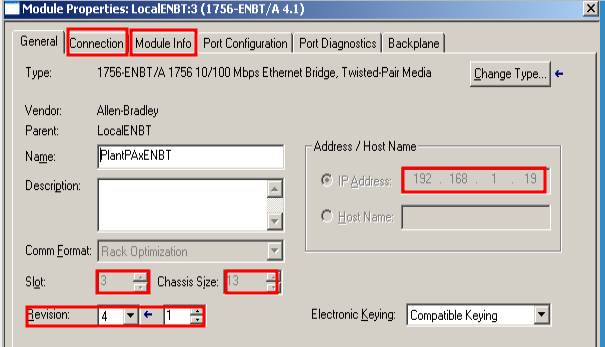
Again, check the properties of the module, to make sure everything is set up correctly. Double check the catalog number of the module you added. Make sure it matches the module you actually have. A common problem with this is adding a 1797-IE8 for example, when the module should have been a 1794-IE8.
Check the slot number of the module you added. Another common issue is that you used the wrong firmware revision In this case, click the “Module Info” tab to see what the revision actually is. Then go back to “General” to see what you entered. Lastly, check the chassis size. If you added a ControlLogix Ethernet module on a remote chassis, the chassis size will usually default to 17. This will give you the error “Invalid Connection Size” on the connection tab.
If it’s a remote chassis, verify the IP address. For example, you could have entered 193.168.1.19 instead of 192.168.1.19.
Different versions have these fields in different places, but you should be able to find all of this information in the properties screen.
For more information, visit the ControlLogix Category Page!
— Ricky Bryce