
Introduction to Relocating Array Data in ControlLogix
In this post, we’ll be Relocating Array Data in ControlLogix by one element. For example, if we have a fault log, we might want to move all of the array data down one element. Our newest data will be at element zero. It’s important to realize that your scan time will jump if you need to relocate large arrays.
Basically, for this post, we’ll have an array of 200 elements. I’ll demonstrate how to move all of this data down by one element. Element 198 will go to element 199. Element 197 will go to element 198, etc. We will need to start at the last element, so we don’t overwrite valuable data as we go. In this case, we will always overwrite the oldest data (element 199).
Tags we need for Relocating Array Data in ControlLogix
In this case, I’ll have a FaultLog. I’ve already populated the fault log with the value of the element number. That way, we can see how our data is moving. My FaultLog contains 200 elements. If you have more than one dimension, then you just need to change your step size, and the amount of data you copy. For example, if you have FaultLog [200,7], then your step size will be -7, and you will be copying 7 elements each loop. For this example, though, we’ll keep it simple so we can concentrate on what is happening in our logic.
I’ll also create some tags to act as our pointers for indirect addressing. The Pointer tag runs the loop. For clarification, I’m also creating PointerS, and PointerD. This will represent the Source and Destination elements.

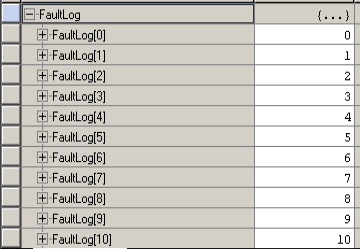
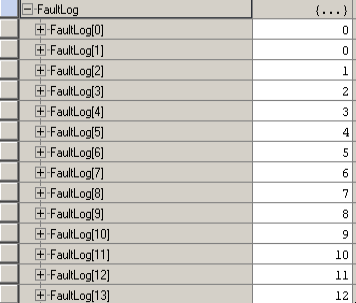
Here are some initial values of my fault log:
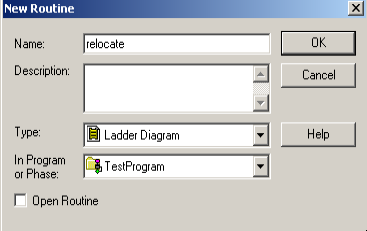
Create Your Subroutine
We’re going to create a subroutine to move the data. Although this would be easier in structured text, not everyone has this functionality. I’ll just use Ladder for this demonstration.
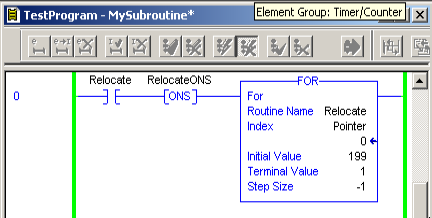
Do not add a JSR to this subroutine. In the next section, we’ll be calling this routine with a FOR instruction.
Add the FOR instruction to your Main Routine
At this point, we’ll add a FOR instruction to the MainRoutine. We’ll want to put a condition on this, and an ONS instruction. When our condition goes true, we don’t want to move the data every single scan. You will need to create a tag for the OneShot instruction, which is BOOL. The FOR instruction will execute 199 times each time the “Relocate” bit goes true. The pointer will start off at 199, and execute the “Relocate” 199 times as well. The first time, the pointer will start off at 199. Since our Step size is -1, this value will decrement each time it calls the “Relocate” subroutine.
Main Logic for Relocating Array Data in ControlLogix
At this point, we are ready to move the data. We’ll go into the “Relocate” subroutine. Recall that the Pointer tag will start off at 199, and decrement each time this routine executes. We’ll use this pointer to determine our source and destination element. The value of “Pointer” itself will be our destination element. Pointer – 1 will be the element that we need to copy data from. This will be our source.
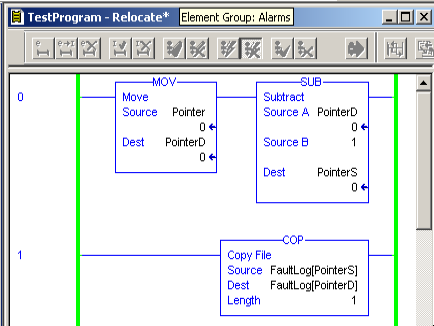
Remember, I could have used the value of pointer instead of PointerD, but I created the extra tag just for clarification within the COPy instruction.
Test Your Work
Let’s toggle the “Relocate” Tag, and observe what happens within our array.
As you can see, all of our data moved down one element. You can now log your latest data to element zero. Let’s try it again
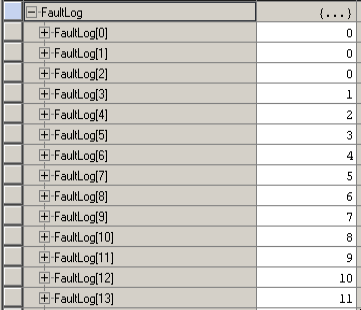
Just keep in mind that we will loose any data at the bottom of our array, which is element 199.
For more information, visit the ControlLogix Category Page!
— Ricky Bryce