
Introduction to Building the Elf Membership Card
Building the Elf Membership Card takes about a half day, although I always tell everyone to plan on twice that amount of time. Don’t get into a rush when building these projects! Always allow for plenty of breaks to think about your next steps.
The COSMAC Elf Membership card is by Lee Hart. You can purchase the kit from his website. This kit has the 1802 processor with 32k of RAM. Additionally, I would recommend purchasing the ROM chip. This will give you a nice monitor for programming, BASIC3, and the Adventureland game. By installing the A18 assembler, you can write your own assembly code for the kit. Once you assemble the kit, it can fit into an Altoids tin!
The 1802 processor was used on the Galileo probe, which went to Jupiter. It’s a much different processor than the 6502, Z80. and 8080 in that most all of your programming uses indirect addressing. For example, if you wish to store data, you don’t specify a memory location directly. Instead, you specify a register that holds the address location that you wish to store data to.
In this post, we’ll take a look at my build, and I’ll discuss some pointers to get you started.
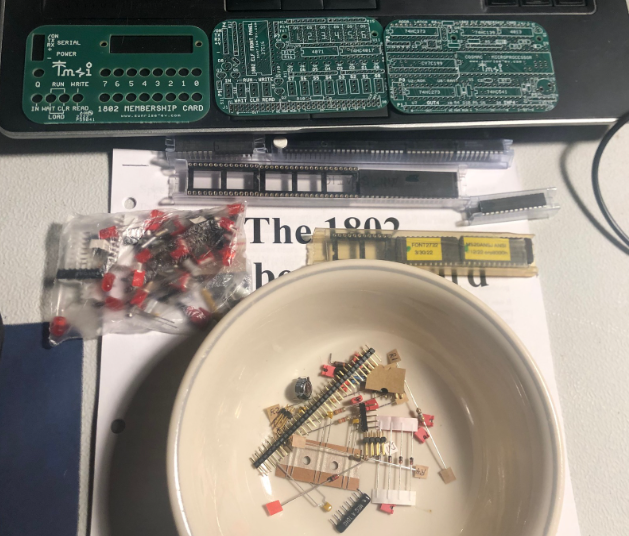
What you get with the Kit
If you purchase The full kit, you will get three boards: The main board, the front panel, and the front panel cover. You also get all of the components you need to build the project, aside from a USB-TTL converter. Lee Hart even gives you an Altoids tin if you purchase the full kit.
Building the Elf Membership Card
Building the board was very straight-forward. You have a couple options for the headers. These options depend on if you want it to fit in an Altoids tin when you are finished or not. It’s a bit more difficult to build the project to fit into the tin, but it doesn’t really require any more skill. You only need a little more patience.
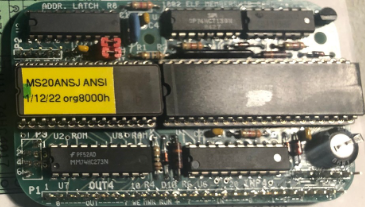
Main Board
The Main Board contains all of the components you will need to have a working computer. This board contains the 1802 processor, RAM, ROM, and some other ic’s and components to support the operation of the machine. In my case, I purchased the extra ROM chip @org 08000h. If you plan on using the board without a front panel, then you probably want the ROM that starts @org 0000h. The board also has a supercap. The purpose of this is to retain your program for a while after you unplug the board from your PC. Be sure to set up all of the jumpers according to the ROM chip that you have. All of the settings are listed in the documentation.
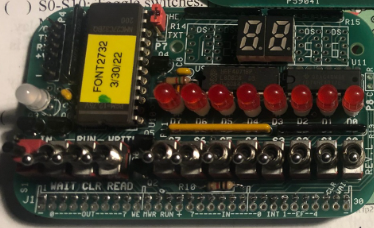
Front Panel
The front panel contains the switches that you need in order to program the machine without a terminal. You have 8 switches for the data plus 3 control switches, and an input button. Additionally, you also have 8 LED’s that display data at the current address when the machine is not running. You can use these in your user program as well when the machine is in run mode. The 7 segment LED’s are a hexadecimal translation of the binary pattern on your lights. You can purchase four more LED displays, and have your program display text as well. In my case, I only have two digits, and I’ve set the jumper to HEX.
Since I’m using a breakout cable, I need to jumper ground to the ON terminal of the programming header. Otherwise, the machine will stay in standby mode.
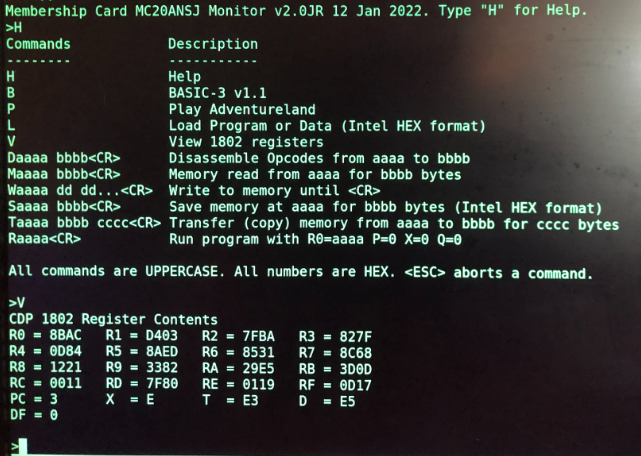
Operating the Machine
As I said before, you can enter a program through the front panel switches. There are some basic programs in the manual to get started. Remember, the ROM is at address 8000h. It’s my understanding that you can hold the INPUT button when going from CLEAR to RUN mode to jump to 8000h. I could not make this work for some reason. I’m probably doing it wrong. Instead, I just added a long branch instruction at address 0000h to jump to 8000h. The opcode for this is C0 80 00. After that, the ROM came up with no problem. Just use the settings of 4800/8/N/1.
Summary for Building the Elf Membership Card
In short, this kit is very easy to build, and it’s lots of fun at a good price. It runs on low power. In fact, you can power it with AA batteries, and they will last you a year or so. It’s small enough to take anywhere, and does not even require a terminal for programming.
For more information, visit the Vintage Computer Category Page!
— Ricky Bryce