
Introduction to ControlLogix Voice Control
This post is to discuss a working proof of concept for ControlLogix Voice Control. I’ll be using Alexa for the voice control, however there are other options available to reduce your reliance on a third party server. There are also several safety considerations for this concept. Although voice recognition has advanced greatly over the past few years, it’s still not perfect. Do not try this concept in any situation where you might have a hazard to personnel or equipment. In other words, don’t use this in production. Use at your own risk.
The concept is simple. We have a wireless microprocessor board that Alexa will recognize. This wireless board simply sends a bit patter to the ControlLogix. We base this bit pattern on a voice command.
Hardware for ControlLogix Voice Control
Obviously, we will need a ControlLogix processor. We will also need a wireless microprocessor board such as the ESP8266 or ESP32. There are several different hardware configurations that you could use. Let’s assume, for example, that you want to interface an ESP32 with the ControlLogix:
- 1756-L6x or earlier with Maxim’s MAX232 IC.
- 1756-L7x or later using a TTL Input module, and 595 shift registers that the ESP32 controls.
- Any ControlLogix processor with a Prosoft MVI56E-MCM Modbus module, and a MAX485 to interface with the ESP32. In this case, you would also need to use a Modbus Library on the ESP32.
- Use an SLC or PLC-5 with serial port that communicates to the ControlLogix. You will also need a MAX232 to convert the ESP32’s TTL (UART) to RS232.
The list could go on and on, but these are probably the simplest ways of setting up communication.
Safety Considerations
It’s important to realize that voice control is not perfect. It’s not even perfect when real humans hear other humans speak. As I said before, this project is simply for prototyping, and experimentation. Let’s take a look at some safety considerations with this setup:
- Alexa could misinterpret voice commands
- Alexa could interpret casual conversation as a voice command
- Alexa could miss important voice commands
- Since I’m not using CRC or BCC error checking in this example, line noise could cause the ControlLogix to mis-interpret a command.
- Errors in your code or library could cause issues with commands.
My Setup for ControlLogix Voice Control
With my setup, I’m using an ESP32. This gives me the ability to emulate up to 15 devices per board. If you need to control more than 15 devices, then you can use multiple ESP32’s as slaves that communicate with one Master ESP32. This master would then relay the commands to the ControlLogix.
I’m simply sending out a numeric code to turn ON a specific device, and a separate code to shut OFF that device. Obviously, each device will have a different numeric code.
Since the ESP32’s UART is at TTL level, I’m using a MAX232 module to convert this signal to RS232. RS232 has higher voltage levels, and an inverted signal.
In the ControlLogix, I’m using an ASCII READ instruction. I simply check the input buffer, and if characters are present, I will read these codes after a small delay. At this point, the code is still an ASCII string, so I’ll then convert this to an integer. After that, I can use compare statements to turn devices on or off (depending on which code we read).
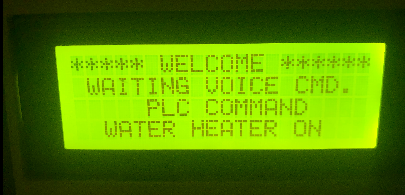
I’m actually taking this one step further by re-sending the code over MODBUS, which an ATMEGA328 reads. The ATMEGA328 displays the command it receives on a 16×4 LCD display.
ESP32 Code for ControlLogix Voice Control
Here is the code listing for my ESP32. I’ve configured this code for the ability to communicate with another ESP32 as well. You will also need a file, “credentials.h”, which contains the SSID and PASSWORD for your wifi system.
#include <Arduino.h>
#ifdef ESP32
#include <WiFi.h>
#else
#include <ESP8266WiFi.h>
#endif
#include "fauxmoESP.h"
// Rename the credentials.sample.h file to credentials.h and
// edit it according to your router configuration
#include "credentials.h"
fauxmoESP fauxmo;
// -----------------------------------------------------------------------------
#define RXD2 16
#define TXD2 17
#define SERIAL_BAUDRATE 115200
#define Serial2_BAUDRATE 9600
#define ID_FIRST "My Alarm"
#define ID_SECOND "Security Light"
#define ID_THIRD "Water Heater"
#define ID_FOURTH "Bedroom Light"
#define ID_FIFTH "Front Room Light"
#define ID_SIXTH "Computer Room Light"
#define ID_SEVENTH "Computer Room Fan"
#define ID_EIGHTH "Pantry Light"
#define ID_NINTH "Kitchen Light"
#define ID_TENTH "Laundry Room Light"
#define ID_ELEVENTH "Bathroom Light"
#define ID_TWELVTH "Porch Light"
#define ID_THIRTEENTH "Driveway Light"
#define ID_FOURTEENTH "Garage Door"
#define ID_FIFTEENTH "PLC Light"
#define ID_SIXTEENTH "Work Light"
#define ID_SEVENTEENTH "PLC Switches"
#define ID_EIGHTEENTH "Mailbox"
#define ID_NINETEENTH "Water For Flowers"
// -----------------------------------------------------------------------------
// -----------------------------------------------------------------------------
// Wifi
// -----------------------------------------------------------------------------
void wifiSetup() {
// Set WIFI module to STA mode
WiFi.mode(WIFI_STA);
// Connect
Serial.printf("[WIFI] Connecting to %s ", WIFI_SSID);
WiFi.begin(WIFI_SSID, WIFI_PASS);
// Wait
while (WiFi.status() != WL_CONNECTED) {
Serial.print(".");
delay(100);
}
Serial.println();
// Connected!
Serial.printf("[WIFI] STATION Mode, SSID: %s, IP address: %s\n", WiFi.SSID().c_str(), WiFi.localIP().toString().c_str());
}
void setup() {
Serial2.begin(Serial2_BAUDRATE, SERIAL_8N1, RXD2, TXD2);
// Init serial port and clean garbage
Serial.begin(SERIAL_BAUDRATE);
// Wifi
wifiSetup();
// By default, fauxmoESP creates it's own webserver on the defined port
// The TCP port must be 80 for gen3 devices (default is 1901)
// This has to be done before the call to enable()
fauxmo.createServer(true); // not needed, this is the default value
fauxmo.setPort(80); // This is required for gen3 devices
// You have to call enable(true) once you have a WiFi connection
// You can enable or disable the library at any moment
// Disabling it will prevent the devices from being discovered and switched
fauxmo.enable(true);
//fauxmo.addDevice(ID_FIRST);
fauxmo.addDevice(ID_SECOND);
fauxmo.addDevice(ID_THIRD);
fauxmo.addDevice(ID_FOURTH);
fauxmo.addDevice(ID_FIFTH);
fauxmo.addDevice(ID_SIXTH);
fauxmo.addDevice(ID_SEVENTH);
fauxmo.addDevice(ID_EIGHTH);
fauxmo.addDevice(ID_NINTH);
fauxmo.addDevice(ID_TENTH);
fauxmo.addDevice(ID_ELEVENTH);
fauxmo.addDevice(ID_TWELVTH);
//fauxmo.addDevice(ID_THIRTEENTH);
fauxmo.addDevice(ID_FOURTEENTH);
fauxmo.addDevice(ID_FIFTEENTH);
//fauxmo.addDevice(ID_SIXTEENTH);
fauxmo.addDevice(ID_SEVENTEENTH);
//fauxmo.addDevice(ID_EIGHTEENTH);
fauxmo.addDevice(ID_NINETEENTH);
fauxmo.onSetState([](unsigned char device_id, const char * device_name, bool state, unsigned char value) {
// Callback when a command from Alexa is received.
// You can use device_id or device_name to choose the element to perform an action onto (relay, LED,...)
// State is a boolean (ON/OFF) and value a number from 0 to 255 (if you say "set kitchen light to 50%" you will receive a 128 here).
// Just remember not to delay too much here, this is a callback, exit as soon as possible.
// If you have to do something more involved here set a flag and process it in your main loop.
// Serial.printf("[MAIN] Device #%d (%s) state: %s value: ct: %u\n", device_id, device_name, state ? "ON" : "OFF", value, hue, saturation, ct);
// Checking for device_id is simpler if you are certain about the order they are loaded and it does not change.
// Otherwise comparing the device_name is safer.
if (strcmp(device_name, ID_FIRST) == 0) {
if (state == 1) {
Serial.println("P001");
Serial2.println("P001");
} else {
Serial.println("P201");
Serial2.println("P201");
}
} else if (strcmp(device_name, ID_SECOND) == 0) {
if (state == 1) {
Serial.println("P002");
Serial2.println("P002");
} else {
Serial.println("P202");
Serial2.println("P202");
}
} else if (strcmp(device_name, ID_THIRD) == 0) {
if (state == 1) {
Serial.println("P003");
Serial2.println("P003");
} else {
Serial.println("P203");
Serial2.println("P203");
}
} else if (strcmp(device_name, ID_FOURTH) == 0) {
if (state == 1) {
Serial.println("P004");
Serial2.println("P004");
} else {
Serial.println("P204");
Serial2.println("P204");
}
} else if (strcmp(device_name, ID_FIFTH) == 0) {
if (state == 1) {
Serial.println("P005");
Serial2.println("P005");
} else {
Serial.println("P205");
Serial2.println("P205");
}
} else if (strcmp(device_name, ID_SIXTH) == 0) {
if (state == 1) {
Serial.println("P006");
Serial2.println("P006");
} else {
Serial.println("P206");
Serial2.println("P206");
}
} else if (strcmp(device_name, ID_SEVENTH) == 0) {
if (state == 1) {
Serial.println("P007");
Serial2.println("P007");
} else {
Serial.println("P207");
Serial2.println("P207");
}
} else if (strcmp(device_name, ID_EIGHTH) == 0) {
if (state == 1) {
Serial.println("P008");
Serial2.println("P008");
} else {
Serial.println("P208");
Serial2.println("P208");
}
} else if (strcmp(device_name, ID_NINTH) == 0) {
if (state == 1) {
Serial.println("P009");
Serial2.println("P009");
} else {
Serial.println("P209");
Serial2.println("P209");
}
} else if (strcmp(device_name, ID_TENTH) == 0) {
if (state == 1) {
Serial.println("P010");
Serial2.println("P010");
} else {
Serial.println("P210");
Serial2.println("P210");
}
} else if (strcmp(device_name, ID_ELEVENTH) == 0) {
if (state == 1) {
Serial.println("P011");
Serial2.println("P011");
} else {
Serial.println("P211");
Serial2.println("P211");
}
} else if (strcmp(device_name, ID_TWELVTH) == 0) {
if (state == 1) {
Serial.println("P012");
Serial2.println("P012");
} else {
Serial.println("P212");
Serial2.println("P212");
}
} else if (strcmp(device_name, ID_THIRTEENTH) == 0) {
if (state == 1) {
Serial.println("P013");
Serial2.println("P013");
} else {
Serial.println("P213");
Serial2.println("P213");
}
} else if (strcmp(device_name, ID_FOURTEENTH) == 0) {
if (state == 1) {
Serial.println("P014");
Serial2.println("P014");
} else {
Serial.println("P214");
Serial2.println("P214");
}
}
else if (strcmp(device_name, ID_FIFTEENTH) == 0) {
if (state == 1) {
Serial.println("P015");
Serial2.println("P015");
} else {
Serial.println("P215");
Serial2.println("P215");
}
} else if (strcmp(device_name, ID_SIXTEENTH) == 0) {
if (state == 1) {
Serial.println("P016");
Serial2.println("P016");
} else {
Serial.println("P216");
Serial2.println("P216");
}
} else if (strcmp(device_name, ID_SEVENTEENTH) == 0) {
if (state == 1) {
Serial.println("P017");
Serial2.println("P017");
} else {
Serial.println("P217");
Serial2.println("P217");
}
} else if (strcmp(device_name, ID_EIGHTEENTH) == 0) {
if (state == 1) {
Serial.println("P018");
Serial2.println("P018");
} else {
Serial.println("P218");
Serial2.println("P218");
}
} else if (strcmp(device_name, ID_NINETEENTH) == 0) {
if (state == 1) {
Serial.println("P019");
Serial2.println("P019");
} else {
Serial.println("P219");
Serial2.println("P219");
}
}
});
}
void loop() {
// fauxmoESP uses an async TCP server but a sync UDP server
// Therefore, we have to manually poll for UDP packets
fauxmo.handle();
// If your device state is changed by any other means (MQTT, physical button,...)
// you can instruct the library to report the new state to Alexa on next request:
// fauxmo.setState(ID_FIRST, true, 255);
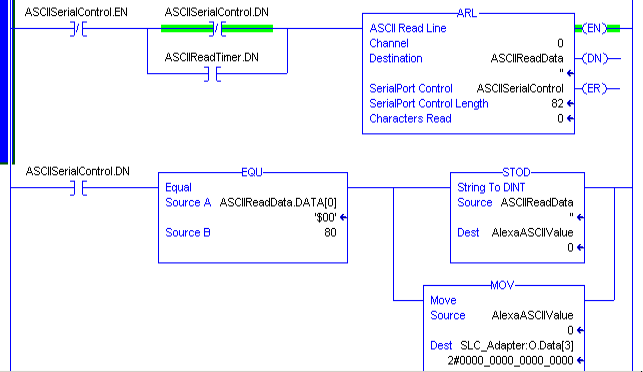
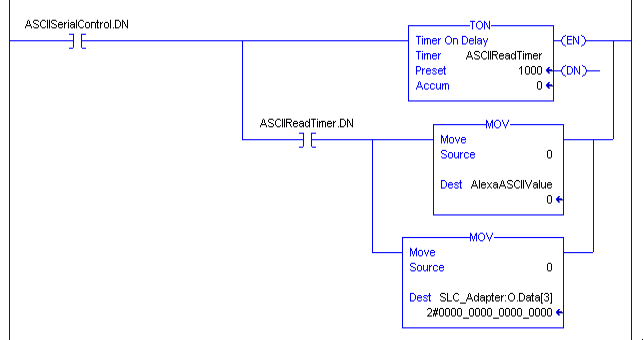
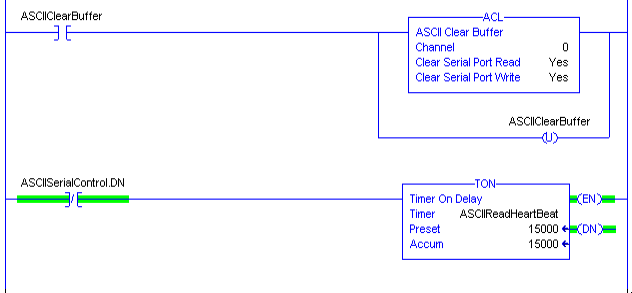
}ControlLogix Code for ControlLogix Voice Control
Below are shapshots of the code in my ControlLogix processor. As you can see, I’m set up to receive codes from other processors, such as the SLC500 as well.

Summary of ControlLogix Voice Control
In short, I’m just using the Fauxmo library to interface with Alexa. Other libraries are available that make things a bit easier. There is a service cost for some of them, but Fauxmo is free, and does not require another 3rd party server. Write your code to send a code out of the serial port for each voice command. You will have separate codes for on and off conditions. Send this to the ControlLogix, either through a serial port, or through a bit pattern on a TTL Input module. If you are using the ASCII method like I did, you can then convert the ASCII code to a DINT (Double Integer). At this point, you can use compare statements to turn on and off various devices.
For more information, visit the ControlLogix Category Page.
— Ricky Bryce