
Introduction to ControlLogix System Start Warning
We’ll set up a ControlLogix System Start Warning to sound a horn for 5 seconds before our equipment actually starts. As with any project, there are multiple ways to accomplish this. One way would be to have the operator hold a button for 5 seconds as the horn sounds. That way, if the operator changes his mind, he can simply release the start button, and the equipment will not start. Another way would be to simply press and release a start button. If he changes his mind, he can simply press the stop button. In this section, I’ll describe both ways of accomplishing this using an on delay timer (TON).
The logic in this post is for example only. Be sure to take additional safety precautions that your facility requires.
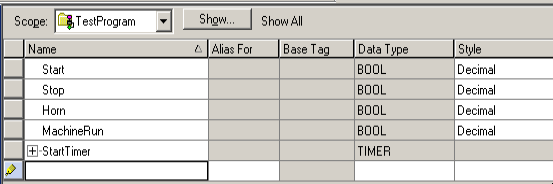
Create the Tags
Before we begin, let’s create some tags that we will use in this project. Obviously, you will need to map the start and stop tags to the actual I/O. If you are using an HMI, simply have the momentary start and stop button objects point directly to the start and stop tags in the processor. In this case, we’ll assume that you have a normally open start button. Likewise, the physical stop button is normally shut.
Case 1: Operator holds Start button
In this case, the operator will need to hold the start button for 5 seconds without releasing it. The stop button will shut down the equipment once it’s running.
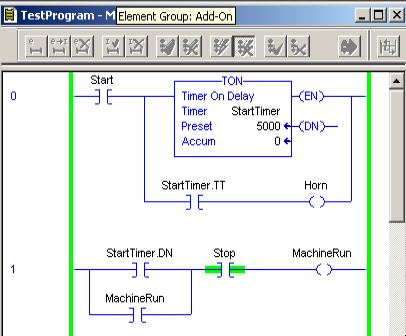
Keep in mind the STOP button is physically shut. When the operator presses the Start button, the StartTimer begins to run. As long as the timer is timing, the horn is blowing. In this case, the duration is 5 seconds. When the StartTimer is DN, the MachineRun bit energizes. This will seal around the StartTimer’s done bit (DN). The MachineRun bit stays true until the operator presses the Stop button.
Case 2: Start Button Seals
At this point, we’ll modify the logic to do something similar. This time, though, the operator only presses the start button momentarily. In other words, he does not need to hold the start button for 5 seconds.
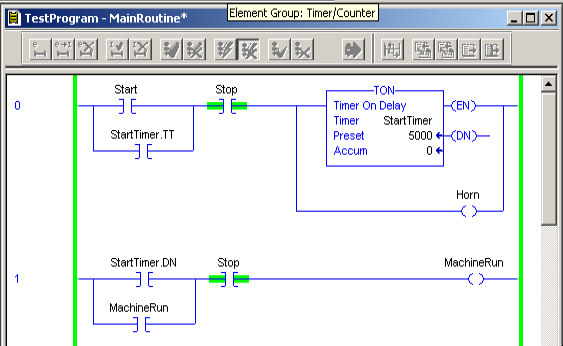
In this example, the operator will press the start button, and the StartTimer will begin to time. We seal around the Start button with the timer’s TT (Timer Timing) bit. When the operator releases the Start button, the timer will continue to run. The horn will blow as long as the timer is timing. If the operator presses the Stop button, the timer will stop running.
Once the timer is done, StartTimer.DN goes true. As long as the operator is not pressing the stop button, the MachineRun bit goes true, and seals around the timer’s done bit. Again, if he presses stop, the MachineRun bit goes false, and will break the seal.
Safety Considerations for ControlLogix System Start Warning
In addition to the Stop button, you may also need to add other bits that will shut down your equipment. This might include a bit that represents the fact that no E-Stops are pressed. Additionally, you might want to make sure that any guard doors are in the safe position. Likewise, you may want to include a bit that indicates that your machine is ready to start. For a machine to be ready to start, you might want to make sure that all cylinders are in the correct position, and all motors are near zero RPM, etc.
Keep in mind that you don’t want to depend on the program only to prevent your machine from running if E-Stops or guard doors are not OK. Always use a separate contact block to ensure your machine is incapable of running. Usually, this involves dropping control power to all prime movers. Be sure to use Safety Relays when necessary. This gives you additional redundancy and diagnostics to keep your equipment operating at a higher level of safety. You will want to make sure there is no chance that anyone (or anything else) is inside of the equipment, or can be harmed in any other way when your equipment begins to run.
For more information, visit the ControlLogix Category Page.
— Ricky Bryce