
Introduction to the VT-132 Terminal Emulator for RC2014
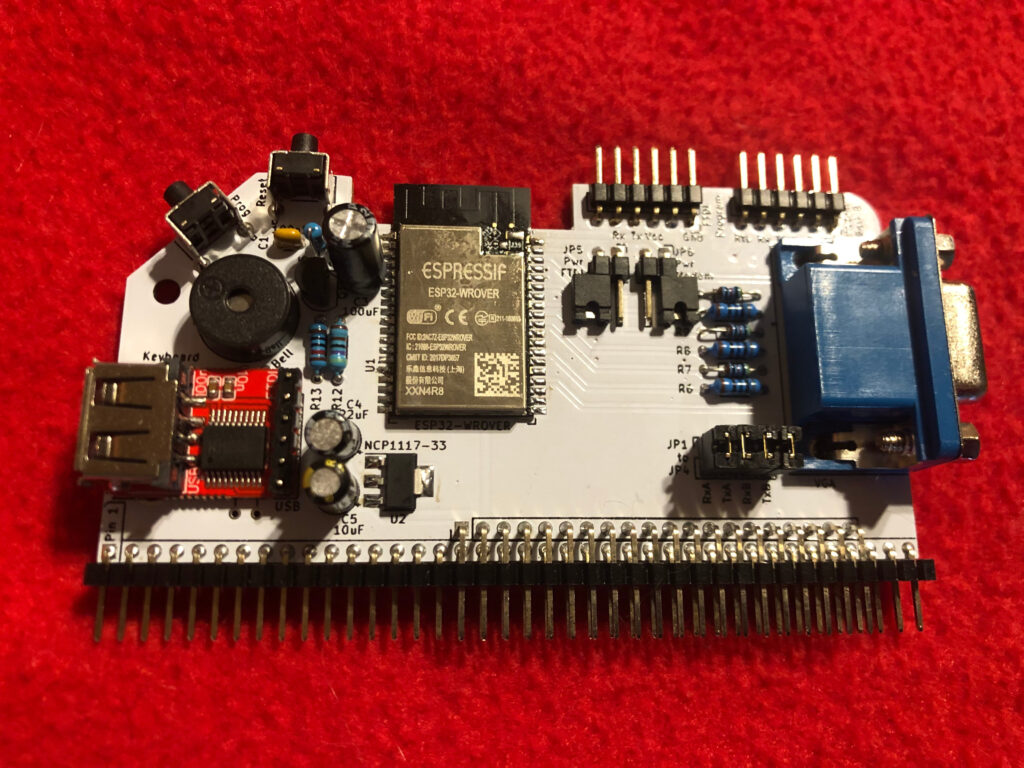
The VT-132 Terminal Emulator for RC2014 allows you to connect a keyboard and monitor directly to your RC2014. This mostly eliminates the need to rely on a modern computer with a terminal emulator. The board comes as a kit from The High Nibble. There are only two surface mount components: The ESP32, and a voltage regulator.
Although surface mount components seem a bit intimidating, they are actually very easy to solder with the right equipment, and a steady hand. Just forego that 4th cup of coffee before you start soldering.
Aside from the surface mount components, there are just a few other components, so you’ll be up and running in no time at all. You can purchase the kit with a PS/2 style connector, or for a USB keyboard. Furthermore, there is also a stand-alone version available.
In this case, I have the Zed Pro with the enhanced backplane. I also have a dual clock module, and a dual serial module. This is the setup I will be explaining in this post. I’m running Clock 1 at 7.3278 MHz (115200 baud) and Clock 2 is at .6144 MHz (9600 baud). Additionally, I’m running CP/M under ROMWBW 3.2.
Setting up your VT-132
If you are not powering your RC2014 through this board, be sure to remove the power jumpers. Also, be sure no other device is putting data on Serial A of the RC2014 bus (You do need to leave your Serial module on the bus. Be sure to install the jumpers for RxA, and TxA.
If you are going to be using the modem feature, then also install the jumpers on RxB, and TxB. Be sure no other device on your backplane is transmitting on Serial B. For the modem feature to work, you will need the Dual Serial module, and an enhanced backplane (or run jumpers from RxB, TxB to Serial B).
Configuring your VT-132
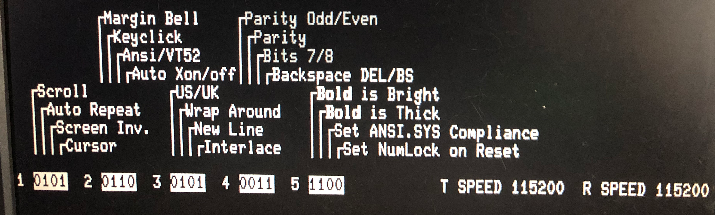
When you first boot your VT-132, you will get an error. This is normal. You need to initialize the NVRAM (Non-Volatile RAM) for this error to go away. At this point, press ALT-PRINTSCREEN. This will get you into the configuration menu. Next press the F1 Key on your keyboard. This will bring up a help file. Press “5” to go to Setup B. You will find a “C” option to initialize the NVRAM.
The other option I wanted to change was how the backspace key works. On Setup B, you will find 16 options at the bottom of your screen. Move your cursor over to the right-most bit of group 4. Press “6” to toggle this bit. You can also toggle key-clicks, interlace, etc on this screen. Once you are finished, press “5” a few times to get back to Setup A. From there, you can save your changes. Be sure to check the “Online” indicator at the right. When you are “Online”, you are actively communicating with your RC2014. Remember, this setup emulates a terminal, which is separate from a computer. You can also go to “Local” mode, which disconnects you from the RC2014. When finished, you can press “0” to reset the terminal.
Press the reset button on your RC2014, and you should see the boot sequence.
Modem Operation for the VT-132 Terminal Emulator for RC2014
Keep in mind that if you wish to use the modem to access BBS systems, this will typically run on Serial B. Obviously, be sure RxB, and TxB jumpers are in place. As I said before, be sure nothing else on your system is transmitting on Serial B, and that you have the dual serial module installed. I am also using QTERM82.
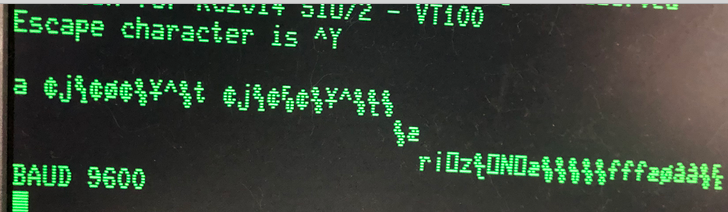
Open QTERM82, and set your caps lock temporarily. Type AT$ to get a help menu. Chances are, you will see garbage. Don’t worry, this is normal. Press the PROG button a few times to get the baud rate set correctly. This is the button on the side of your VT-132 board. When it’s set correctly, you will see your baud rate appear in QTERM.
At this point, you are ready to connect to your WIFI network. type “AT$” (without quotes) to get a help menu. This will list your options.
Simply type “AT+W=SSID,PASSWORD” again without quotes. Be sure to enter your SSID exactly as it appears on your network.
To verify you received an IP address from the router, just type “AT+W$”.
At last, you are ready to connect to a BBS. To connect, type “ATDBBSNAME:PORT” ATD is “Attention, Dial”. Then without any space, enter the name of the BBS and port (if required) of the BBS you wish to connect to. You can search for BBS Systems, but realize that they come and go, so if one doesn’t work, simply try others. You can change your FONT/CODEPAGE on Setup C.
Summary of the VT-132 Terminal Emulator for RC2014
In short, be sure you are not supplying power from two different places on your board. Usually, you’ll probably want to remove the power jumpers. Install the Jumpers for Tx and Rx on the ports you will use. After you power up your unit, press ATL-PRINTSCREEN to get to the setup page, and initialize your NVRAM. Adjust the backspace, save your changes from Setup A, and you should be up and running!
For more information, visit the Vintage Computer Category page!
— Ricky Bryce