
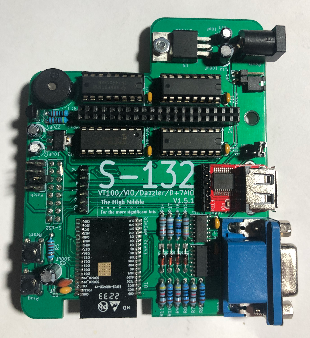
Introduction to the S-132 Terminal for IMSAI 8080esp
The S-132 Terminal for IMSAI 8080esp turns your IMSAI into a stand-alone computer. This terminal board mounts on the back of your IMSAI. You will have a keyboard port, monitor port, and a port for other devices such as a printer module and joysticks. This kit is available from The High Nibble, along with the accessories. Furthermore, you can choose the model with a PS2 keyboard port, or USB.
It’s important to read the build notes on this board. I did not, and put the ESP32 on the board upside down. As it turns out, this was easy to fix by removing the solder and hitting it with hot air for a few seconds. Nevertheless, any time you make a mistake like that, you risk damaging the board. The surface mount components are very easy to install as long as you use flux. Just make sure everything is facing the right way before you solder them.
Everything you need to know about this module is on TheHighNibble.com. However, I like to create these posts to explain my own experiences, and document the setup of my own system.
Power and Mounting
The module can pull power from your IMSAI, or supply power to your IMSAI. Obviously, if you use the DC Jack on the S-132, you will want to remove 5V power from the ESP32 module in your main IMSAI unit. Furthermore, you have a jumper that allows you to bypass the regulator. This allows you to use a 5v power supply. Another option is to remove the bypass jumper if you have a power supply with higher voltage (7.5-12 VDC).
It’s important to realize the higher your supply voltage is, the hotter the 7805 regulator will become. Personally, I do not like to exceed 9v. By all means, do not bypass the regulator if your supply is greater than 5V! Dave did a great job on this design, but at first it seemed a little bit quirky. This was because the 5V to my IMSAI through USB was not allowing enough current. Once I used the DC jack, everything was great.
Because I did not want to drill a hole in IMSAI’s acrylic, I just made a 16 pin “extension cord”. Later on, I will print a case for it. I noticed there are some ribbon cables available on Ebay as well if you don’t want to build your own. I’m cheap though, so I used a couple Cat 5 Ethernet cables (~1 ft), and a dual row male and female header.
Configure the S-132 Terminal for IMSAI 8080esp
Configure the IMSAI
There is not much to configure on the S-132 itself just to get started. However, there are some configuration changes you will need to make to your boot configuration. From the Web interface, simply go into SYS:. After that, I made the following changes to boot.conf:
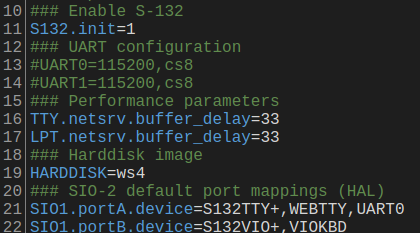
I simply enabled the S-132 on line 10. Additionally, I made some changes to lines 21 and 22 to direct TTY and VIO through the S-132 module.
You will find different configurations in the S-132 configuration documentation for both the IMSAI, and Cromemco firmware.
After that, you can boot your IMSAI. You will get an error on the S-132, which is normal. Simply customize the terminal, and save your changes. You will not get this error again.
Customize the S-132
Just like a real VT-100 terminal, there are a few things you can customize on the S-132. Press ALT+PRINTSCREEN. to access these menus. F1 will bring up the help menu to show your options. Press 5 to navigate through setup screens A through D. On Setup Screen B, there are some important configuration settings you will want to take a look at. Personally, I like to shut off the Interlace bit, and turn on the DEL/BS bit. You might want to shut off your KeyClick if it annoys the wife!
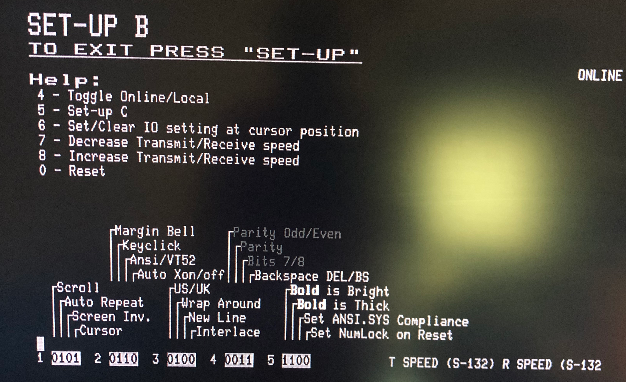
Don’t forget to hit key “5” to get back to Setup A so you can save your changes!
Functions
Similar to Linux, you can navigate through the different terminals using CTRL-ALT, and a function key. It might be a good idea to place some labels on your function keys. Remember… a sharp pencil is better than a sharp mind!
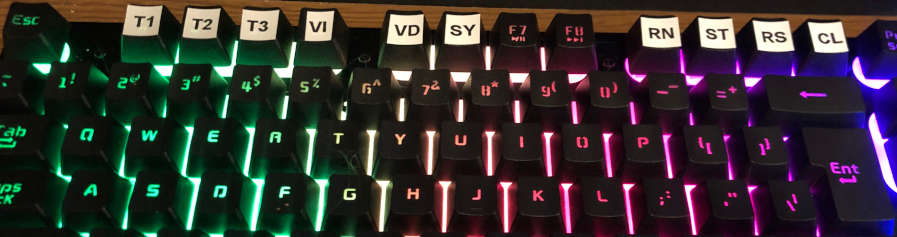
- F1 — TTY1
- F2 — TTY2 (Cromemco Firmware)
- F3 — TTY3 (Cromemco Firmware)
- F4 — VIO (For IMSAI firmware)
- F5 — Dazzler (For IMSAI Firmware)
- F6 — System Menu
- F7 — D7+AIO (Cromemco Firmware)
- F8 — Unused
- F9 — Run
- F10 — Stop
- F11 — Reset
- F12 — Clear
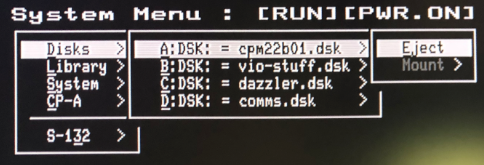
System Menu
Press CTRL+ALT+F6 to access the system menu. From here, you can mount, and eject disks. Additionally, you can start, stop or reset your IMSAI from this menu. You can also access your configuration files. For the most part, this allows you to use your IMSAI without using the Web Interface.
Summary of S-132 Terminal for IMSAI 8080esp
In short, this addition made the IMSAI more fun. I find myself getting more involved with systems that do not rely on modern computers to use. The S-132 hit the mark on filling in this gap. Dave also has a VT-132 available for the RC2014, or even a stand-alone unit. The setup menus for these other terminals are similar. Obviously, though, you don’t have the same use of the Function Keys.
For more information, visit the Vintage Computers Category Page!
— Ricky Bryce